Paid events and add-ons
Table Management: build a seating chart
Table Management turns your guest list into a seating chart. Draw the room, seat your guests, then give them a page where they type their name and see their table.
Updated
Try it first, free
Open any event and choose Table Management in the navigation pane. Before you buy it, it runs in preview with sample guests, on free events too.
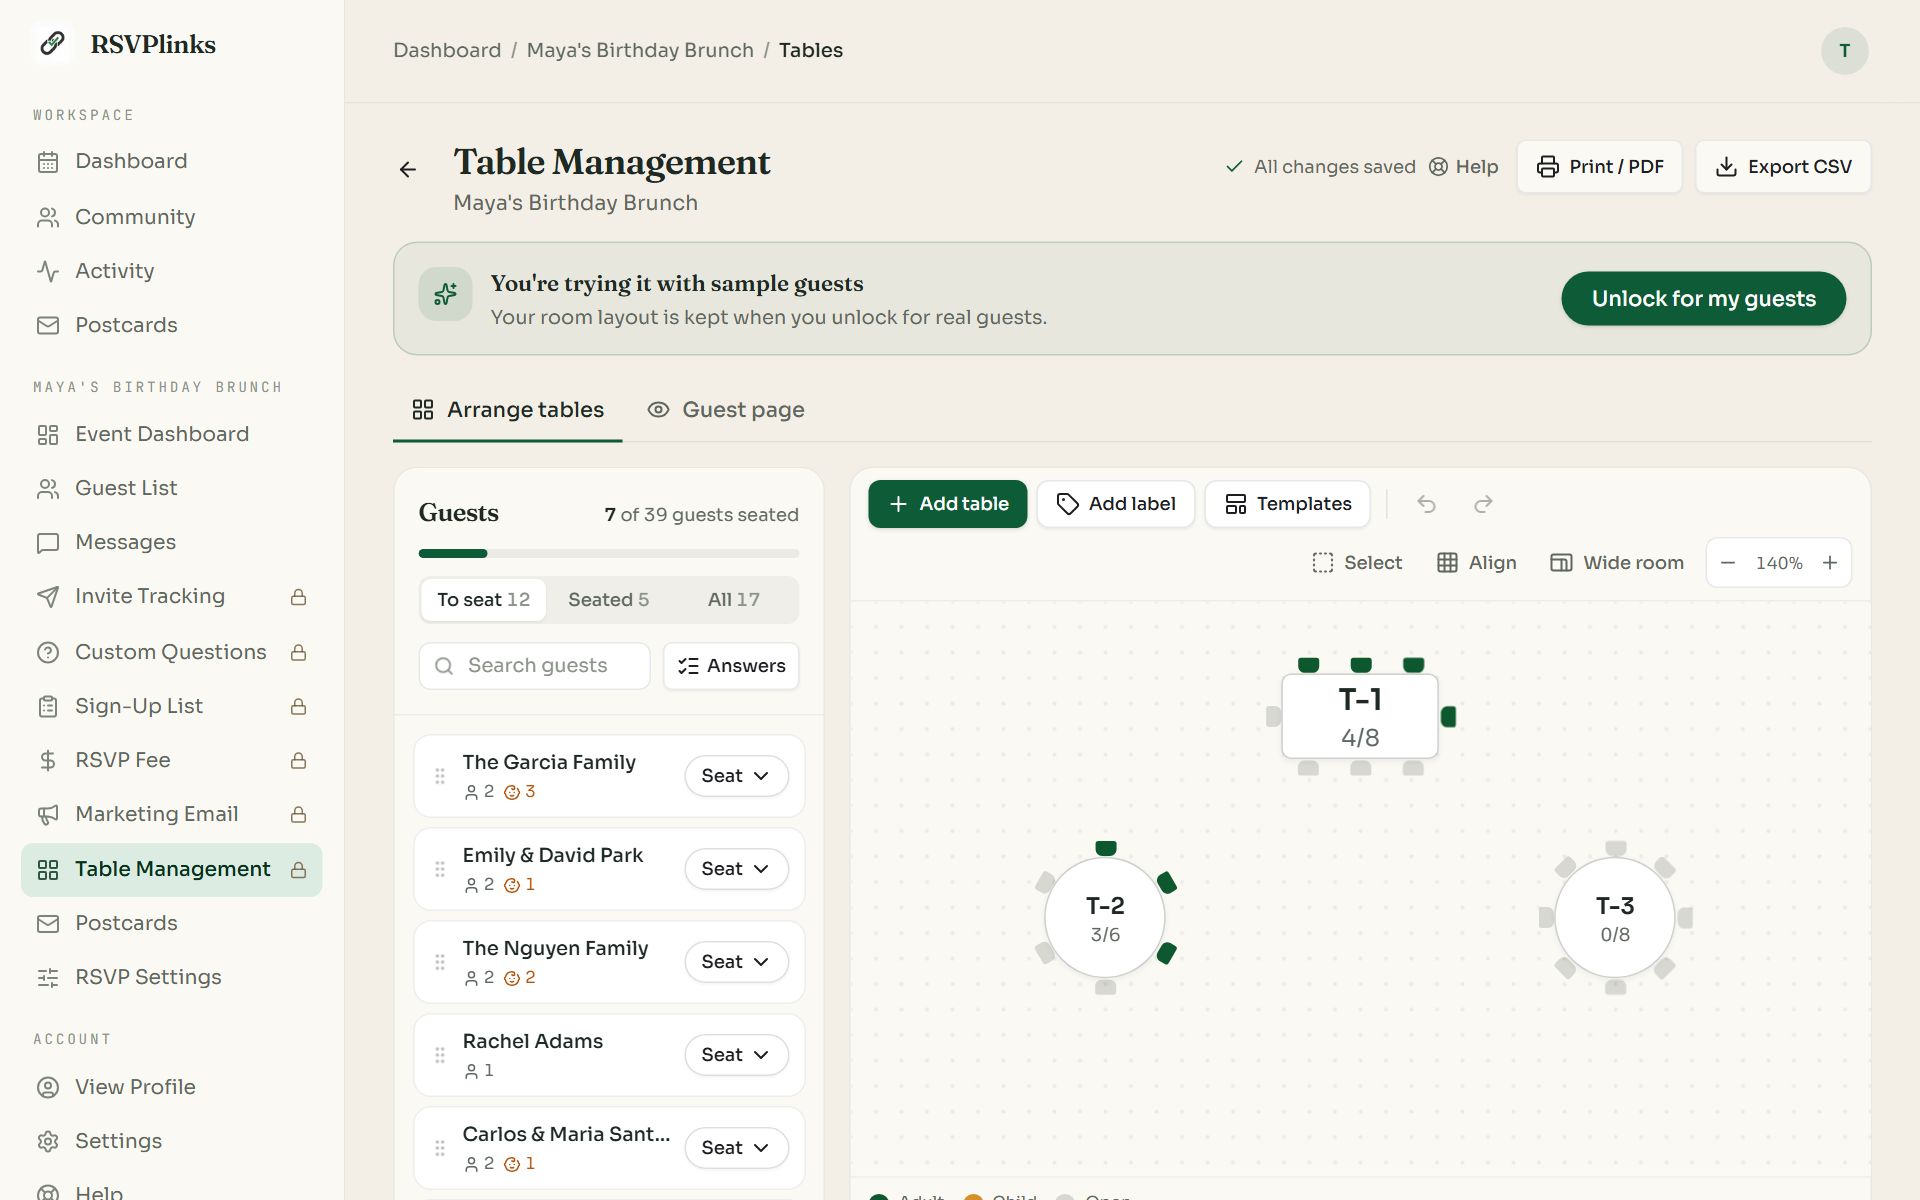
Swipe sideways to see the whole screen, or tap it to enlarge.
- 1The preview banner. You are working with sample guests. The room you build is kept.
- 2Unlock for my guests swaps the samples for your real guest list.
- 3To seat. Guests who do not have a table yet.
- 4Seat places that guest at a table from a menu.
The seating editor
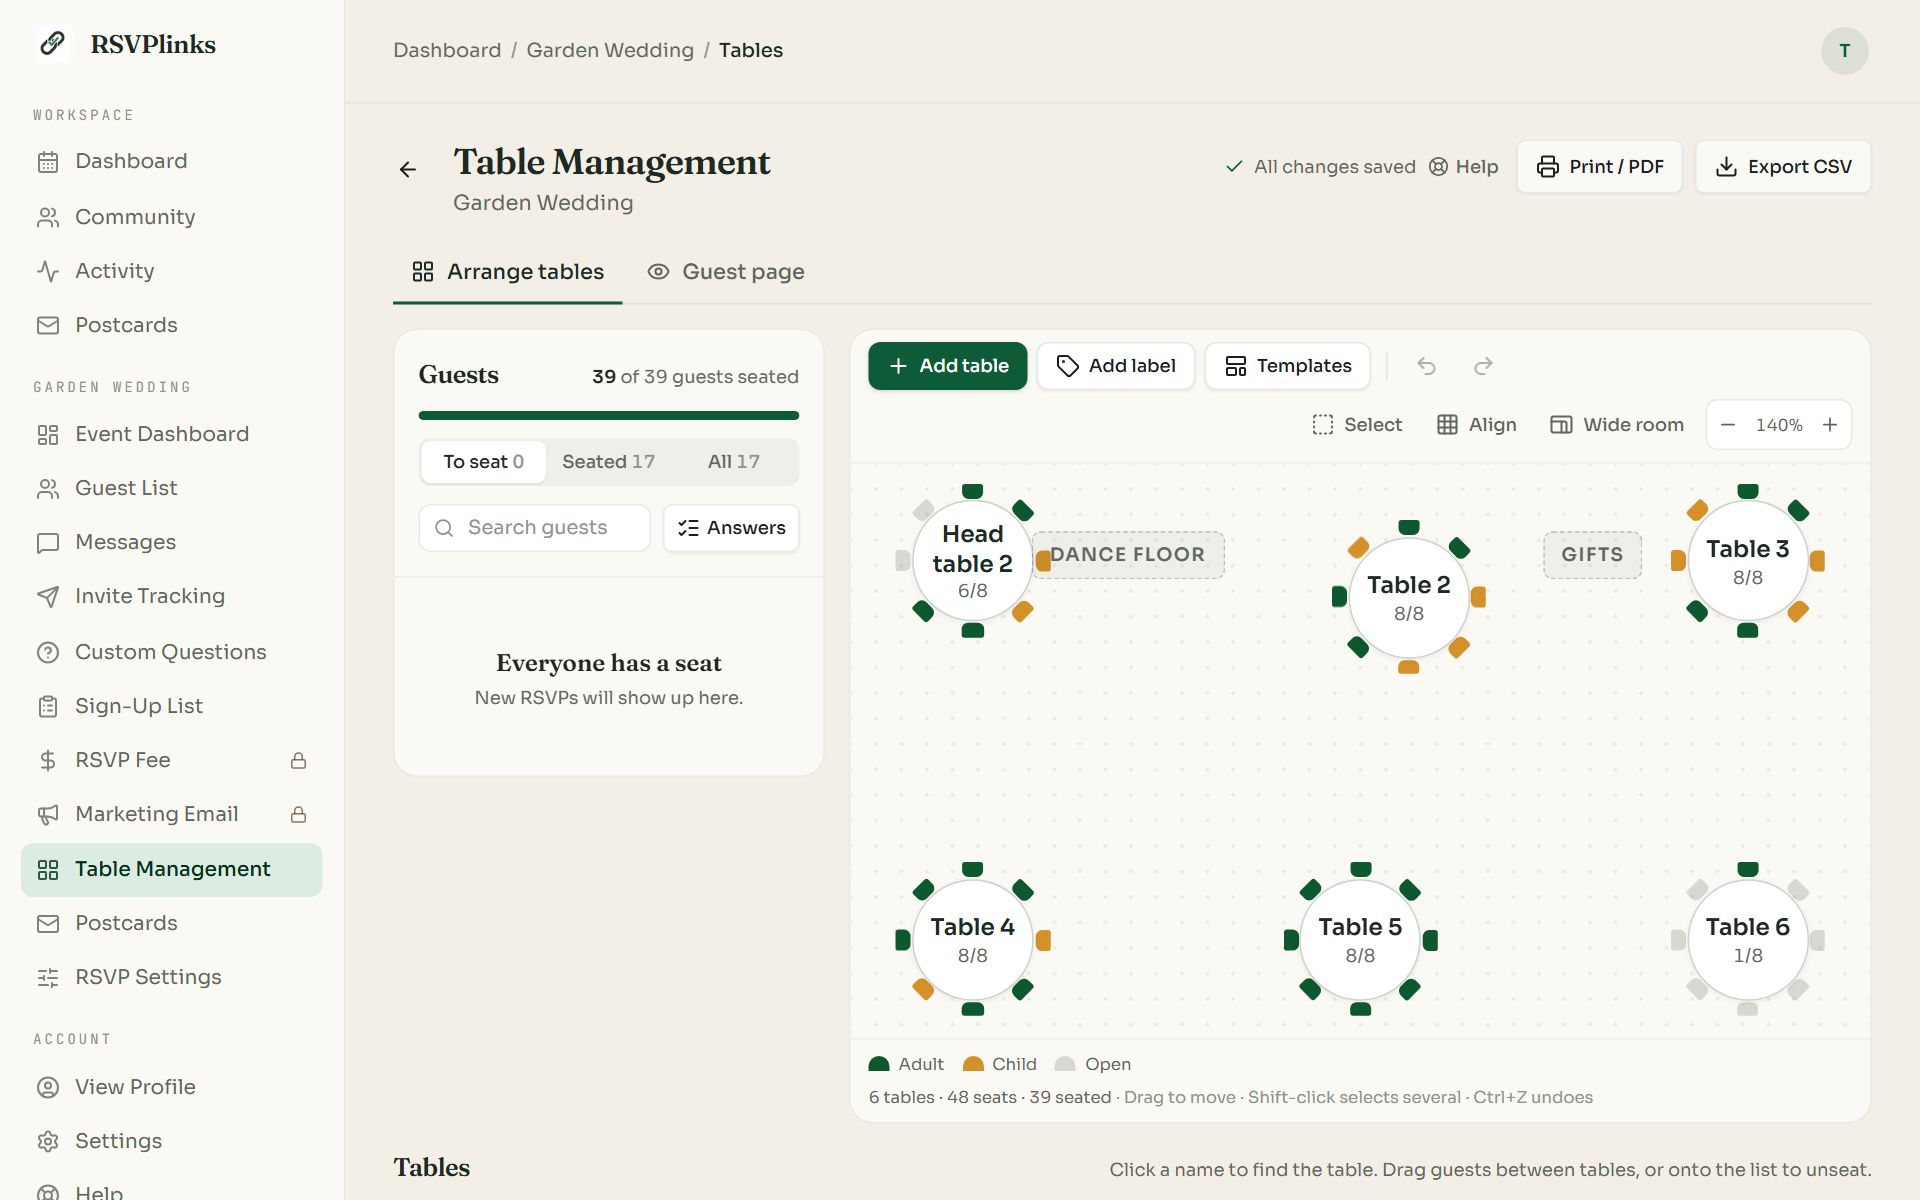
Swipe sideways to see the whole screen, or tap it to enlarge.
- 1Guests. Everyone to be seated, with filters for To seat, Seated and All, and a search box.
- 2Add table.
- 3Add label marks spots such as the dance floor or the bar.
- 4Templates lays the whole room out for you.
- 5Align snaps tables to a grid and tidies rows.
- 6Guest page is what your guests will see.
- 7Print / PDF prints the chart.
Changes save by themselves; the header shows All changes saved. Undo and Redo (Ctrl+Z, Ctrl+Shift+Z) step back through tables and seating alike.
Add tables and lay out the room
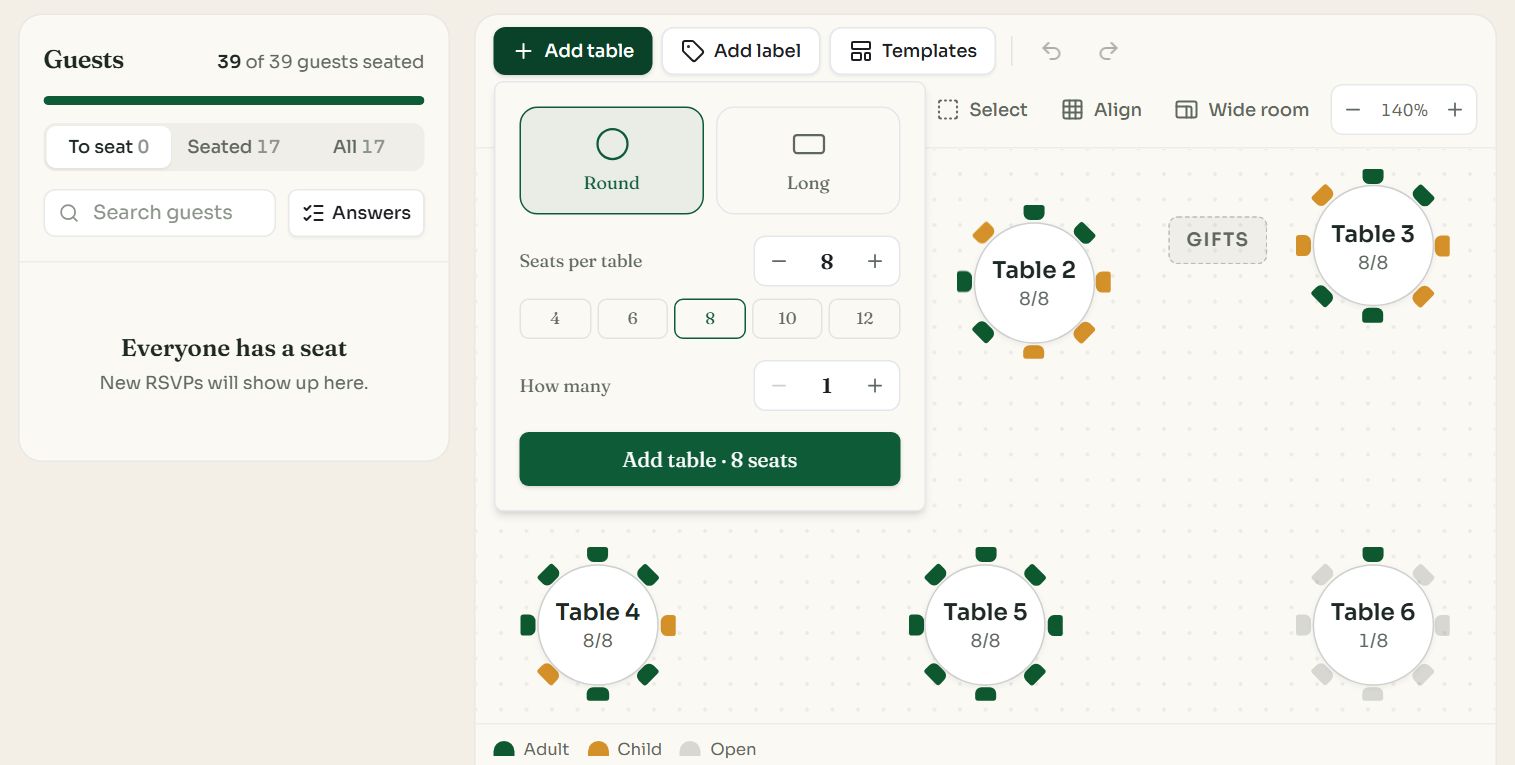
Swipe sideways to see the whole screen, or tap it to enlarge.
- 1
Press Add table
Choose Round or Long.
- 2
Set seats and quantity
Seats per table goes up to 50. How many adds several identical tables at once. A room holds up to 200 tables.
- 3
Drag tables into place
New tables land in free space. Drag any table to move it.
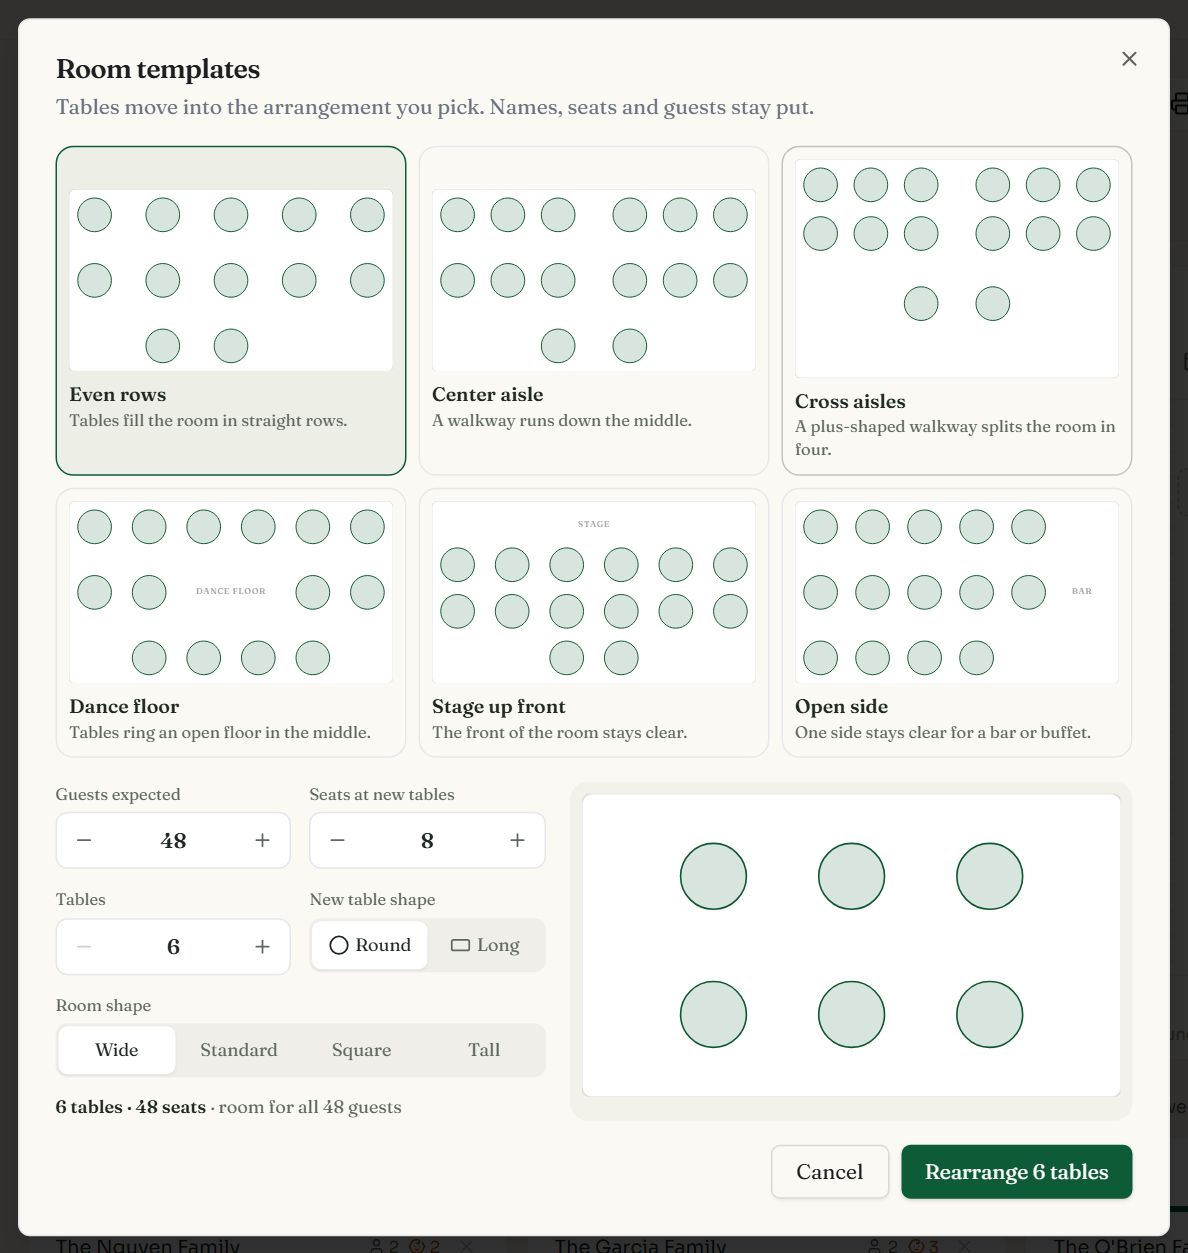
Templates arranges your tables as even rows, around a dance floor, with a center aisle and more. Names, seats and guests stay put.
- Room shape (Wide, Standard, Square, Tall) matches the canvas to your venue.
- − and + make every table smaller or bigger.
- Select (or Shift-click) picks several tables to move, space evenly or delete together.
- Under Align: Snap to grid while dragging, Line up rows and columns and Tidy into an even grid.
- Quick labels include Stage, Dance floor, Bar, Buffet, Entrance, DJ, Photo booth, Cake and Gifts, or type your own.
Rename or change a table
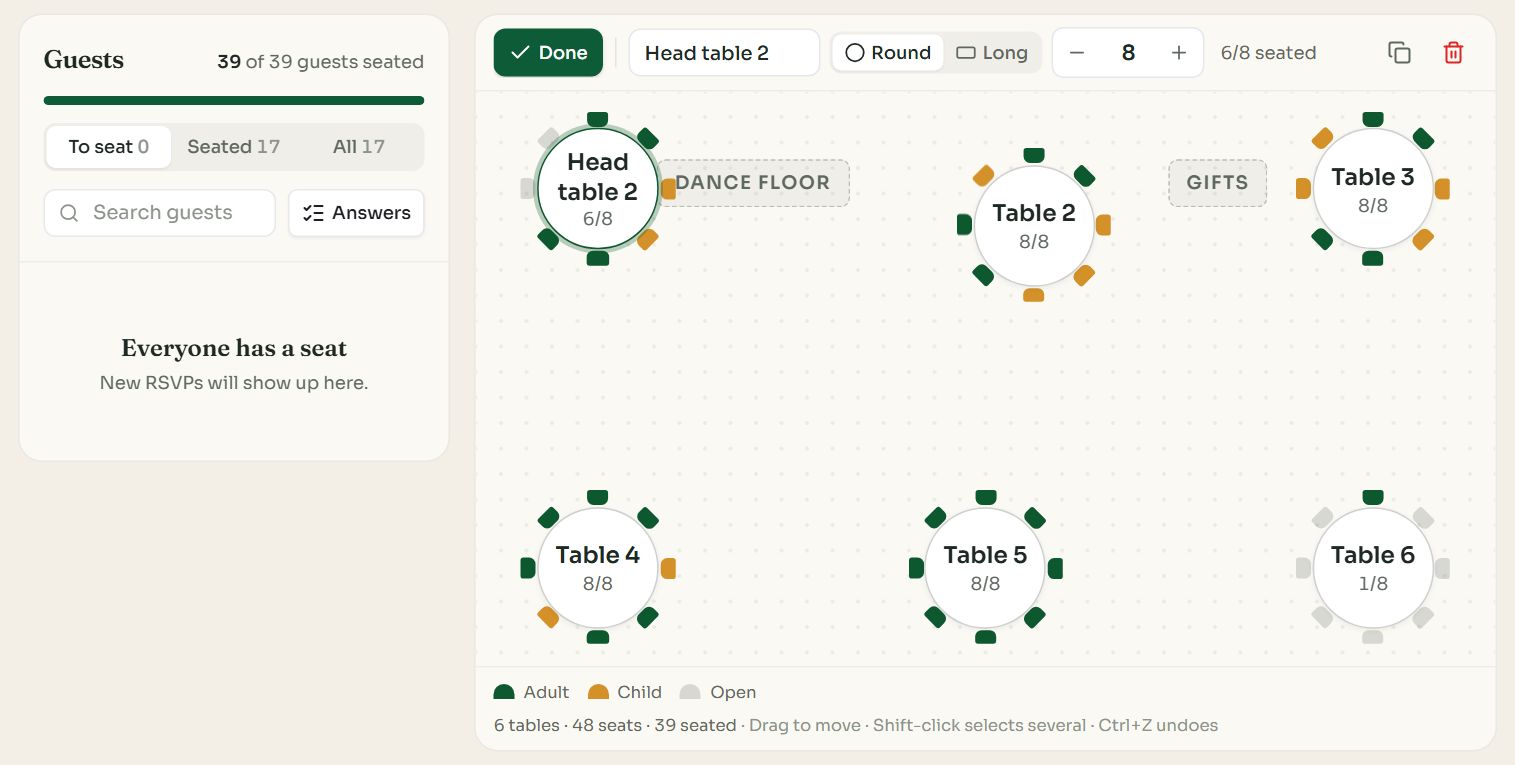
Swipe sideways to see the whole screen, or tap it to enlarge.
- 1Done closes the table's controls.
- 2Name and shape. Rename the table (Head table, Family, Table 7) and switch Round or Long.
- 3Seats and how many are taken.
Click a table to select it. The icons at the right duplicate or delete it. Deleting a table returns its guests to the To seat list.
Seat your guests
- Drag a guest from the list onto a table, or onto another table to move them. Drag them back to the list to unseat.
- Seat on a guest's row picks a table from a menu, which is easier on a phone.
- Auto-seat fills the remaining seats for you, keeping each party together. Guests already seated stay where they are.
- A party takes as many seats as its guest count. Kids' seats are tinted differently from adults'.
- Split party…, in a guest's Seat menu, divides a large party across tables, for example adults at one and children at another.
- Answers shows chosen RSVP answers, such as a meal choice, beside each guest.
Share the find-your-table page
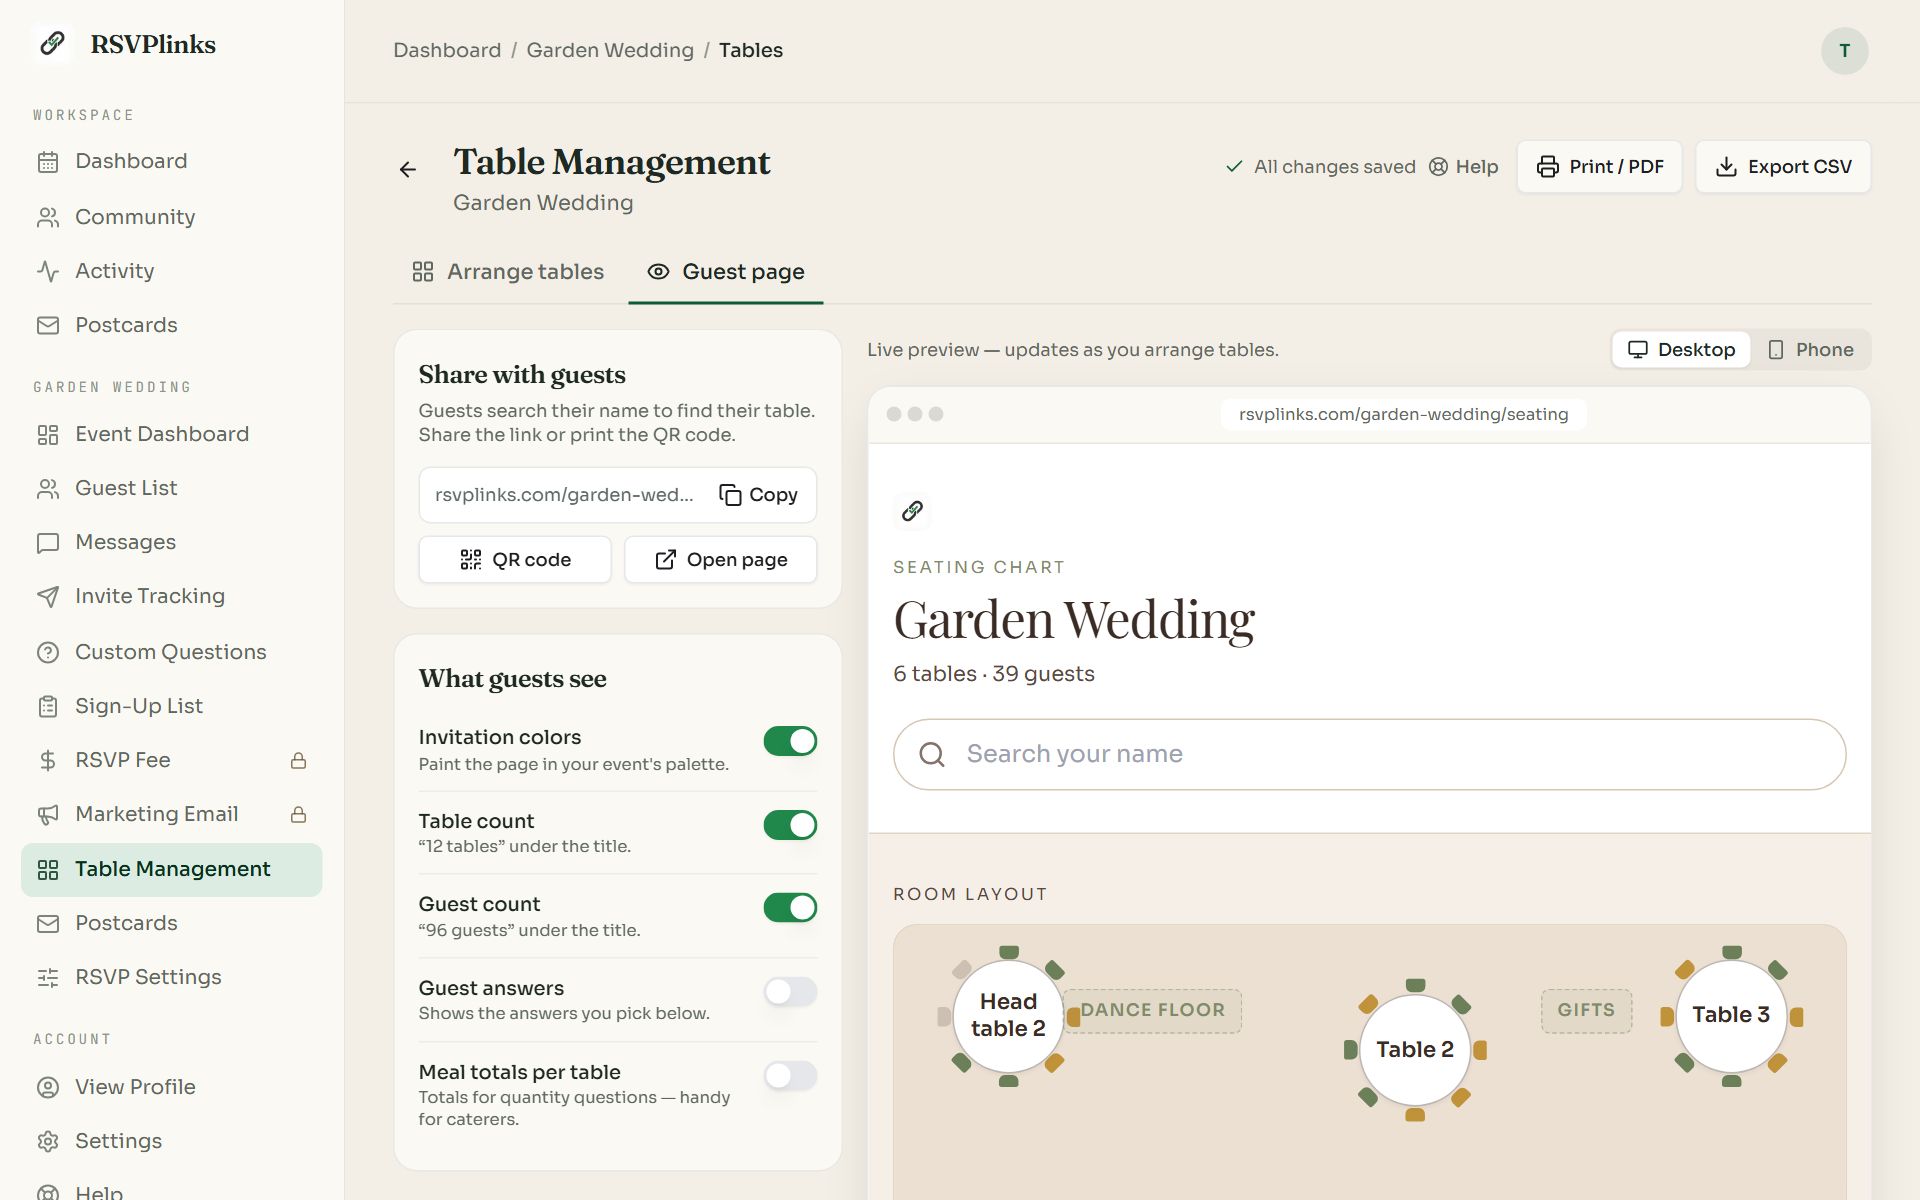
Swipe sideways to see the whole screen, or tap it to enlarge.
- 1Share with guests. The seating link, with Copy and Open page.
- 2What guests see. Switch on your invitation colors, table and guest counts, chosen answers and meal totals.
- 3QR code to print on a welcome sign or table cards.
Guests open the page, type their name and see their table, highlighted on the room layout. The page updates as you rearrange. See the guest view.
Print or export the chart
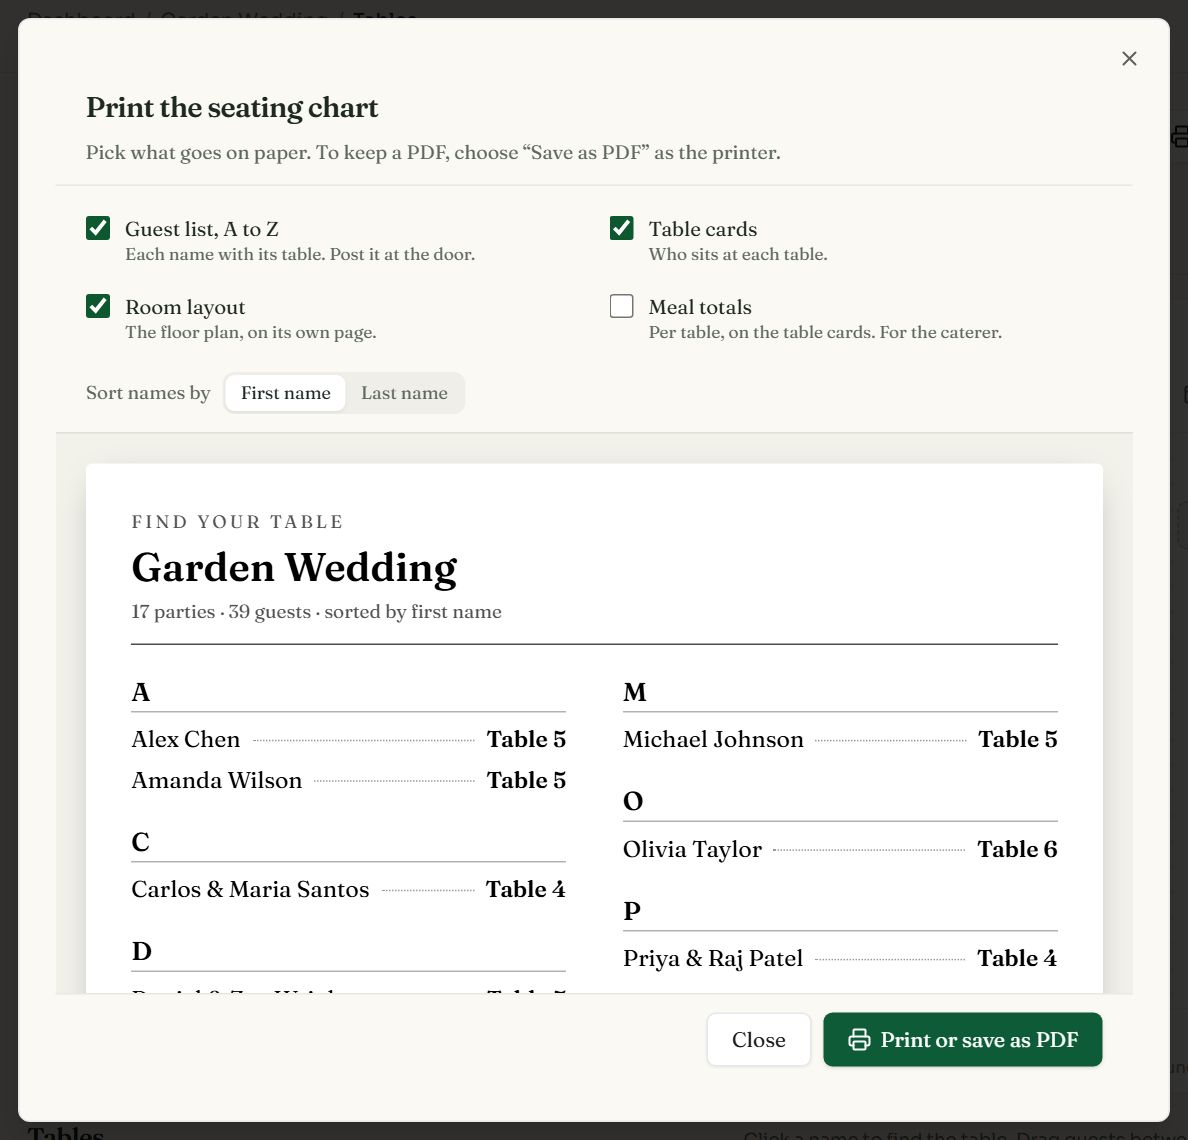
| Option | What prints |
|---|---|
| Guest list, A to Z | Each name with its table. Post it at the door. |
| Table cards | Who sits at each table. |
| Room layout | The floor plan on its own page. |
| Meal totals | Per-table totals for quantity questions, for the caterer. |
Press Print or save as PDF, and choose “Save as PDF” as the printer to keep a file. Export CSV in the header downloads the seating as a spreadsheet for your venue.
Common questions
- Can I try the seating chart before paying?
- Yes. Open Table Management on any event, including a free one. It runs with sample guests, and the room you build is kept when you unlock it.
- How much does Table Management cost?
- $6 or 1 credit per event, as an add-on to any paid plan.
- Can guests look up their own table?
- Yes. Share the seating link or print its QR code. Guests type their name and see their table and where it is in the room.
- Can I split a family across two tables?
- Yes. Open the party's Seat menu, choose Split party, set how many go in each part, and seat the parts separately.
- What happens to seating when new guests RSVP?
- They appear in the To seat list. Seat them by hand or press Auto-seat, which leaves existing seating untouched.
Still stuck?
Check the FAQ for quick answers, or send us a message and a person will reply.